How to Fix Audio Clipping in Premiere Pro: 4 Easy Solutions for Seamless Audio
Struggling with audio clipping in Premiere Pro? Learn the 4 best methods to smooth audio splits, remove pops, and create seamless transitions using crossfades, constant gain, and more. Fix your audio fast!

TLDR: Audio clipping in Premiere Pro can be fixed using the Essential Sound panel's loudness normalization, the Hard Limiter effect, manual gain reduction, or the DeClip plugin; the right method depends on how severe the clipping is.
One of the most common issues video editors face in their editing workflow is audio clipping between splits in their video. This makes unnecessary popping or clicking sounds in the video that are unpleasant to the ear.
A quick fix might be to head to the Crossfade options in the Audio Transitions menu and drag the ‘Constant Gain’ effect over every single split, but this can be tedious to do for an entire project file. If you’re looking for a more efficient way to fix audio clipping in Adobe Premiere Pro, we’ll let you in on the best methods today.
What exactly is audio clipping and how to identify it in Premiere Pro?
Audio clipping is when there is a hard cut in the waveform of your project, which creates an abrupt transition that can be jarring for viewers to listen to. You can especially notice this when working with dialogue, sound effects, or music tracks.
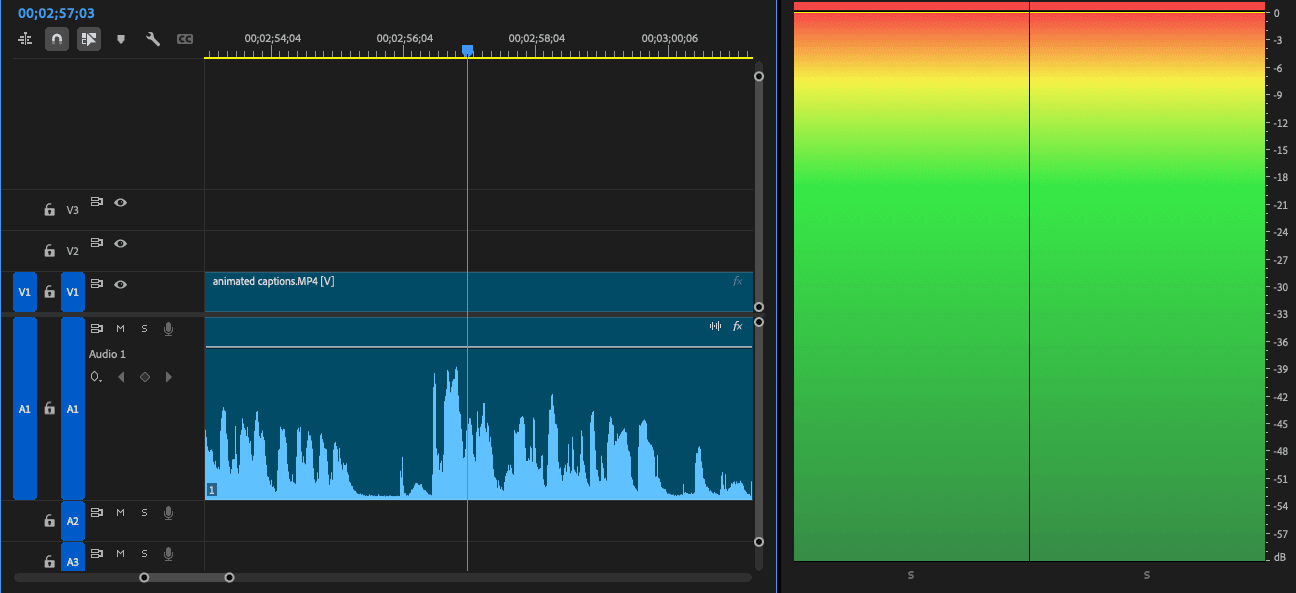
When looking at a waveform, audio clipping can be identified when the audio reaches the top line of the waveform, representing audio that is either too loud or distorted.
You can keep an eye on audio clipping whilst working on your project by looking out for your audio levels in the Audio Meter Panel. If the meter reaches 0 dB (or the red zone) then it means that your audio is clipping. You can add the Audio Meter Panel to your Premiere Pro interface by accessing it in the [Window] menu and selecting [Audio Meters].
4 Best Ways to Fix Audio Clipping in Premiere Pro
1. Use Crossfades For Smooth Transitions
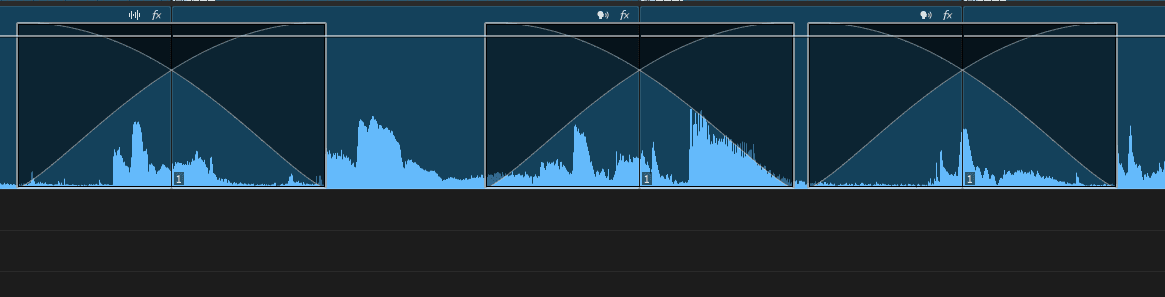
Get the effect of adding ‘Constant Gain’ to every cut without the manual labour. You can easily add crossfades to your transitions by:
Selecting all of the audio clips where you want transitions to happen.
Using the [Shift+D] shortcut to ‘Apply Default Transition’ (which can also be done by right-clicking —> this will automatically apply a short crossfade (’Constant Power’), and get rid of clipping whilst creating a smooth transition.
2. Copy and Paste the Desired Transition Effect
If, for example, you prefer to have the ‘Constant Gain’ effect, but want a faster method to apply it than manually adding it to every transition, you can simply copy and paste the transition:
Apply the ‘Constant Gain’ effect to one split.
Right-click the effect and copy it [Ctrl/Cmd+C]
Select the split where you want your transition, then paste [Ctrl/Cmd+V]
3. Reduce the Volume
Another simple way to fix audio clipping in Premiere Pro is by simply lowering the volume.
Right-click on your audio clip.
Select [Audio Gain…]
Adjust Gain by however many decibels that you’d like.
4. Use the Hard Limiter effect
For another all-in-one fix, try using the hard limiter effect.
Got to the [Effects] menu.
Select [Audio Effects]
Select [Hard Limiter] and set a maximum dB level (e.g., 4dB) to add a restriction to how high your audio levels can go.

Fixing audio clipping in Premiere Pro doesn’t have to be a painful process. Whether you opt to automate crossfades, use the copy-paste method, simply reduce the volume, or use the hard limiter effect, these techniques will help ensure your audio transitions sound seamless.
For more tips on troubleshooting Premiere Pro issues, check out our technical video editing guide.
For more Premiere Pro editing tips and tricks, explore our latest content on the Cutback blog or Cutback’s official YouTube channel.
Frequently Asked Questions (FAQs)
Q: What is audio clipping in Premiere Pro, and how do I identify it?
A: Audio clipping in Premiere Pro refers to two different problems that are often confused. The first is edit-point clipping, a popping or clicking sound at the cut between two clips, caused by an abrupt waveform transition. The second is peaked clipping, distortion caused by audio recorded or boosted above 0 dB, where the waveform hits the ceiling of the audio range. You can identify peaked clipping by watching the Audio Meter Panel; if it hits 0 dB or the red zone during playback, your audio is clipping. Edit-point pops are audible as clicks on cuts and visible as hard waveform transitions at the edit point.
Q: How do I fix audio popping at cuts in Premiere Pro?
A: The fastest method is to select all audio clips, use Shift+D to apply the default audio transition (Constant Power crossfade) to every cut simultaneously. This adds a short fade across each edit point and eliminates the pop without touching individual clips. If you prefer Constant Gain over Constant Power, apply it to one cut, right-click the effect and copy it (Ctrl/Cmd+C), then select each remaining cut and paste (Ctrl/Cmd+V).
Q: How do I fix audio that is too loud or distorted in Premiere Pro?
A: For audio peaking above 0 dB, there are two direct fixes. The first is volume reduction: right-click the clip, select Audio Gain, and lower the gain by the number of dB needed to bring peaks below 0. The second is the Hard Limiter effect: go to Effects > Audio Effects > Hard Limiter and set a maximum dB ceiling (e.g., -1 dB). This prevents the audio from exceeding the set level across the entire clip without requiring manual gain adjustment per clip. For a more thorough fix, the Essential Sound panel's Loudness normalization automatically targets broadcast-standard levels.
Q: What is the difference between Constant Gain and Constant Power crossfades in Premiere Pro?
A: Both are audio transition effects applied at edit points to eliminate pops and smooth the transition between clips. Constant Power creates an equal-power curve that fades one clip out and the other in simultaneously, which sounds more natural on most audio and is Premiere Pro's default. Constant Gain applies a linear fade, which can sometimes produce a dip in perceived volume in the middle of the transition. For dialogue and speech, Constant Power is generally preferred; for music transitions where a linear fade is intentional, Constant Gain gives more predictable control.
Q: How do I fix audio cuts that sound abrupt in Premiere Pro?
A: Abrupt audio cuts are caused by hard waveform transitions at edit points. The fix is to apply a short crossfade at each cut, select the audio clips, and use Shift+D to apply the default transition to every edit point at once. For more control, apply a J-cut or L-cut: a J-cut lets the incoming audio start slightly before the video cut, and an L-cut lets the outgoing audio continue slightly past it. Both create a more natural, overlapping audio transition that eliminates the hard edge.
Q: Why does my audio sound bad after editing in Premiere Pro?
A: The most common causes are edit-point pops from abrupt waveform transitions (fix with crossfades), peaked audio from clips recorded or boosted above 0 dB (fix with gain reduction or Hard Limiter), inconsistent levels between clips from different recordings (fix with Essential Sound panel normalization), or codec-related distortion from compressed source footage like H.264 MP4 at a low bitrate. If the audio sounds bad only after export and was fine in the timeline, check your export bitrate settings; a low audio bitrate (below 192 kbps for AAC) introduces compression artefacts.
Q: Can I fix audio clipping online without Premiere Pro?
A: Several browser-based tools offer audio repair and loudness normalization without requiring a desktop NLE, including Adobe Podcast's Enhance Speech (free, browser-based) and Auphonic. These are useful for fixing peaked/distorted audio on standalone audio files. For edit-point pops specifically, fixing them requires access to the edit point itself, which means working inside your NLE rather than on an exported file. If you use Premiere Pro, the crossfade methods in this post resolve edit-point pops directly in the timeline before export.

Kay Sesoko
Marketer
Share post


