How to Set Up a Proxy Workflow in Premiere Pro
How to create, toggle, and troubleshoot proxy media in Premiere Pro, including a real way to do it without Media Encoder if AME isn't working or available.
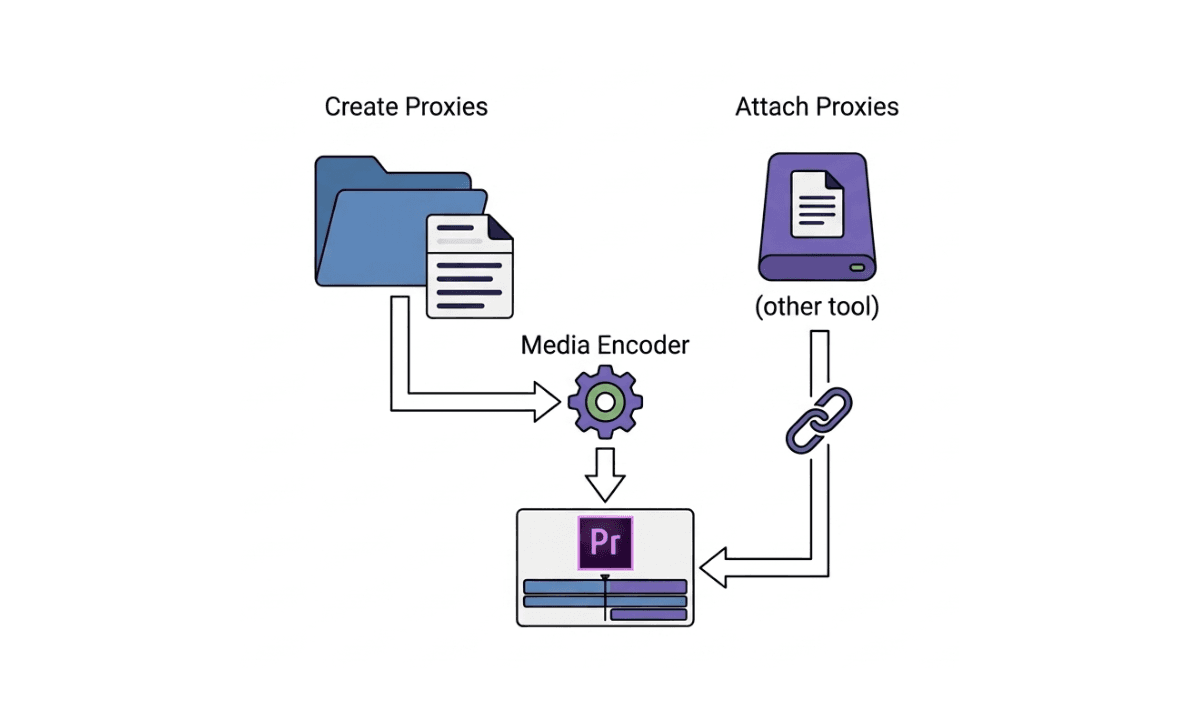
TLDR: Premiere's native "Create Proxies" always routes through Media Encoder, but there's a real workaround if AME isn't available: generate proxies elsewhere and attach them manually.
Premiere Pro's proxy system is more straightforward than DaVinci Resolve's two-path setup; there's really one built-in method, plus one genuine workaround worth knowing if that built-in method isn't working for you. This guide covers both, how to actually toggle proxy playback once it's set up, and which settings to pick.
How to Create Proxies in Premiere Pro
Premiere gives you two entry points to the same underlying process, both of which hand the actual encoding job to Adobe Media Encoder.
On import: in the Import window, enable Create Proxies, choose a preset (High, Medium, or Low; more on what those actually mean below), and Media Encoder starts generating proxies automatically as your footage comes in.
After import, for footage already in your project: select the clips in the Project panel, right-click, and choose Proxy > Create Proxies. Same process, applied retroactively.
Either way, Media Encoder does the actual work in the background while you keep editing. This holds true across recent versions. If you're specifically looking for "how to create proxies in Premiere Pro 2025" or "2026," the process hasn't changed in any meaningful way between those versions.
How to Create Proxies in Premiere Pro Without Media Encoder
Here's the honest answer: Premiere's own Create Proxies command cannot run without Media Encoder. They're integrated by design; there's no setting or workaround that lets Premiere generate proxies on its own. If you're hitting this because Media Encoder won't open, won't communicate with Premiere, or isn't installed, that's usually a version-mismatch issue (Premiere and Media Encoder need matching version numbers to talk to each other) or a missing installation, worth checking Creative Cloud for both before trying anything else.
But there's a real way to get proxies into Premiere without touching Media Encoder at all; it just means generating them somewhere else first. Any external tool that outputs a proxy-format file works: DaVinci Resolve's built-in proxy generation, the standalone Blackmagic Proxy Generator app (free, and it doesn't require Resolve to be open), HandBrake, or a command-line tool like ffmpeg. Once you have proxy files sitting alongside your originals, bring them into Premiere and use Proxy > Attach Proxies instead of Create Proxies. This command links existing files rather than generating new ones, so Media Encoder never enters the picture.
The one requirement: filenames and folder structure need to be consistent enough for Premiere to match each proxy to its original. If that matching fails, the attach step won't work, and files need to be linked manually one at a time.
How to Toggle Proxies in Premiere Pro
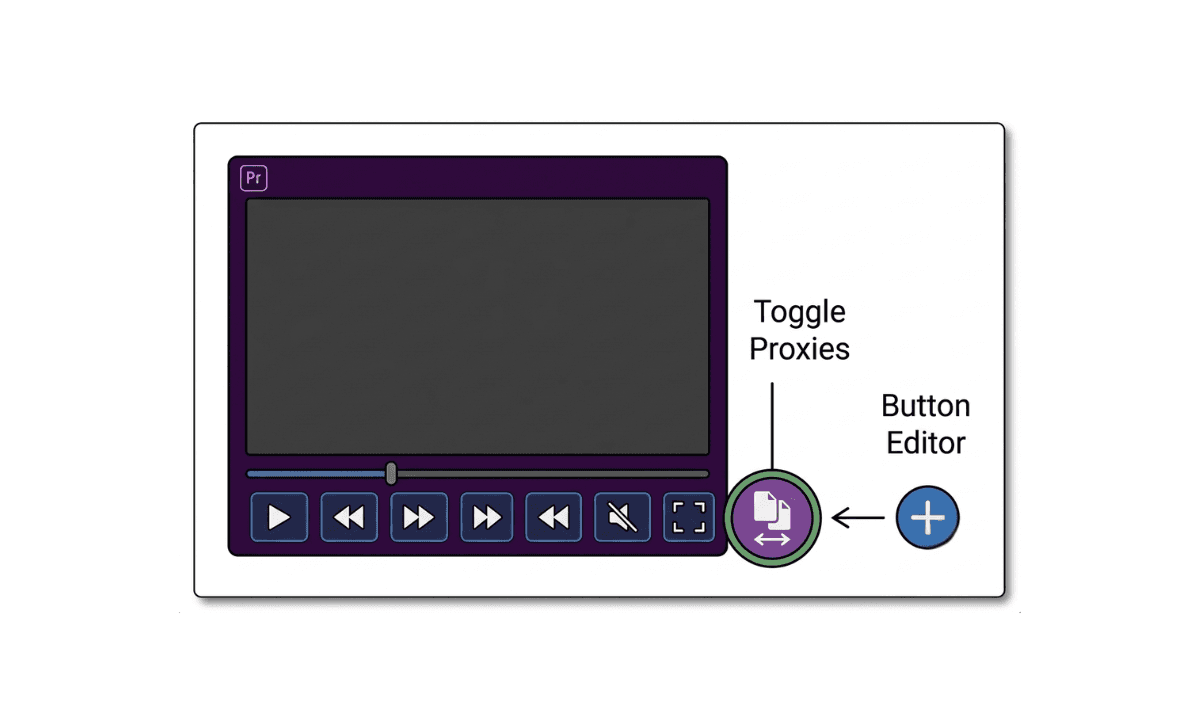
Once proxies exist and are linked, switching between proxy and full-resolution playback is a single click, not something that happens automatically just because proxies exist. Look for the Toggle Proxies button at the bottom of the Program Monitor. If it's not visible, it's not turned on by default in every workspace; click the Button Editor (the small + icon at the end of the Program Monitor's button row) and drag Toggle Proxies into your visible toolbar.
With it enabled (highlighted), Premiere plays back the lightweight proxy files. Toggled off, you're viewing full-resolution originals, useful for checking fine detail before a final export, at the cost of playback smoothness.
What Proxy Settings Should You Use in Premiere Pro?
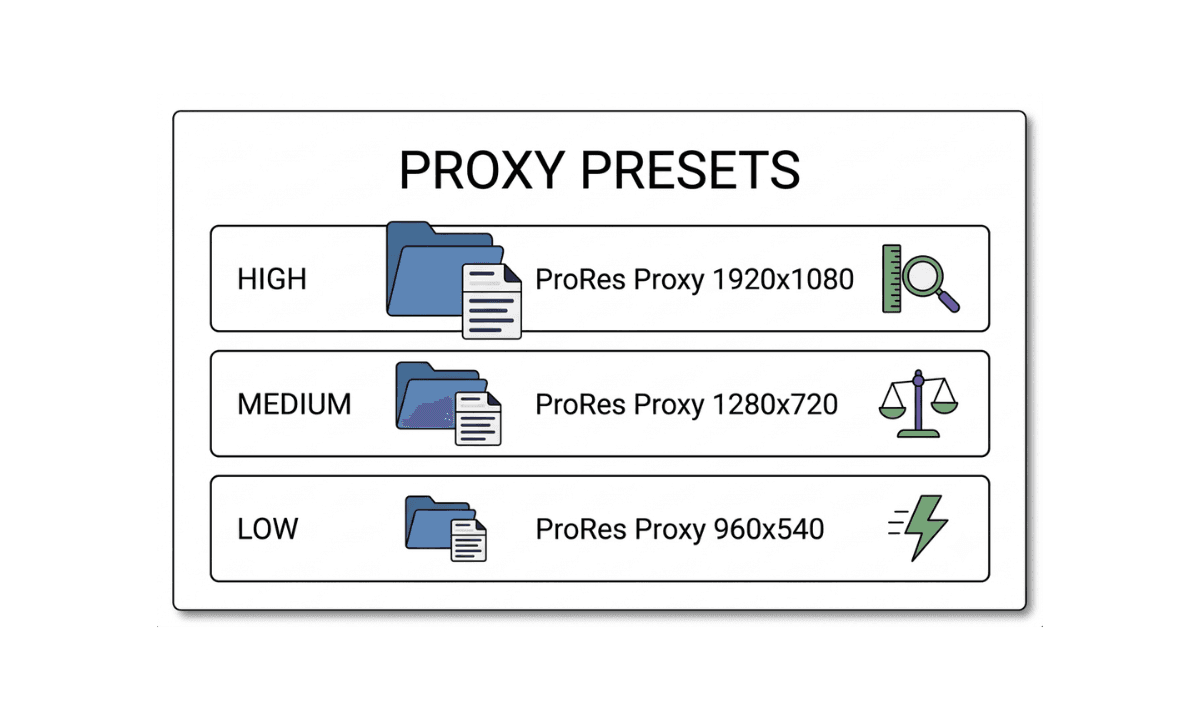
Premiere's proxy presets are deliberately simplified into three tiers, and it's worth knowing what they actually map to under the hood:
High = ProRes Proxy at 1920x1080
Medium = ProRes Proxy at 1280x720
Low = ProRes Proxy at 960x540
All three use the "stretch to fill" flag by default, meaning non-standard aspect ratios get stretched to fit rather than letterboxed. For most editing situations, Medium is a reasonable default, providing smooth scrubbing without generating unnecessarily large files. Drop to Low if you're editing on a lower-spec machine or working with very high-resolution originals (6K and above), and reserve High for situations where you're doing detailed reframing work during the edit itself and want more visual precision while cutting.
If you need a custom preset outside these three tiers, editors report it's easier to build the export settings inside Premiere first (matched to your footage, with whatever LUT or overlay you need), save that as a preset, then bring it into Media Encoder as an ingest preset, rather than trying to configure a fully custom proxy preset from inside Media Encoder directly, which lacks some of the preview controls Premiere's export panel has.
Why Use Proxies in Premiere at All?
The short answer: your original camera files, especially anything 5K, 6K, or 8K, take real CPU effort to decode every time you scrub the timeline. Proxies are a lightweight stand-in that plays back smoothly, then get swapped for the full-resolution original before you color grade or export. Nothing about editing with proxies affects your final delivered quality, as long as the relink happens correctly before export. That swap is exactly what the Toggle Proxies control, and the underlying file-matching is built to handle automatically.
One caveat worth knowing if your footage doesn't have a standard, constant frame rate (common with some phone-shot footage): Premiere and Media Encoder can't generate a QuickTime proxy that preserves a variable frame rate. The proxy gets created at a standard constant rate instead, which can cause a mismatch that makes playback and scrubbing feel worse, not better, defeating the point of using a proxy in the first place. If proxies feel sluggish specifically on phone footage, this is a likely cause.
Bringing Selects-Prepped Footage Into a Premiere Proxy Workflow
If you're using Selects for pre-editing, generate your proxies in Premiere first (or via the external-tool workaround above), then import only the proxy folder into Selects, not your original camera files alongside it. Selects analyzes whichever set it's given and builds your rough cut from that footage.
Once the draft is ready, Selects hands off a native .prproj project file. Opening it in Premiere, the timeline references your proxy media the same way it would if you'd built the sequence manually. From there, relinking to your originals works through the standard Link Media command: select the clips, right-click, and Premiere matches them by filename and metadata.
For a wider look at how proxy workflows compare across NLEs, or if DaVinci Resolve's proxy setup is also part of your workflow, the full comparison across Premiere, DaVinci Resolve, and Final Cut Pro and the dedicated DaVinci Resolve guide cover the other two setups in the same depth as this one.
Frequently Asked Questions (FAQs)
Q: How do I use the proxy workflow in Premiere Pro?
A: Enable Create Proxies during import, or select existing clips and choose Proxy > Create Proxies from the right-click menu. Either way, Adobe Media Encoder generates the proxy files in the background. Once they exist, use the Toggle Proxies button in the Program Monitor to switch between lightweight proxy playback and full-resolution originals, and relink to your originals via Link Media before final export.
Q: Why use proxies in Premiere Pro?
A: Large camera files, especially 5K, 6K, and 8K footage, take real CPU effort to decode during scrubbing and playback. Proxies are smaller, lighter stand-in files that play back smoothly, then get swapped for the original before color grading and export. This doesn't affect final output quality, only editing performance, as long as the relink to originals happens correctly.
Q: How do you toggle proxies in Premiere Pro?
A: Use the Toggle Proxies button at the bottom of the Program Monitor. If it's not visible, click the Button Editor (the small + icon at the end of the button row) and drag Toggle Proxies into your toolbar. Enabled, Premiere plays back proxy files; disabled, you're viewing full-resolution originals.
Q: What proxy settings should I use in Premiere Pro?
A: Premiere's three built-in presets map to specific ProRes Proxy resolutions: High is 1920x1080, Medium is 1280x720, and Low is 960x540. Medium is a reasonable default for most projects. Drop to Low for very high-resolution originals or lower-spec editing machines; use High when detailed reframing during the edit matters more than file size.
Q: How do you create proxies in Premiere Pro without Media Encoder?
A: Premiere's own Create Proxies command always requires Media Encoder; there's no way around that specific feature. The real workaround is generating proxy files in a different tool entirely (DaVinci Resolve, the standalone Blackmagic Proxy Generator, HandBrake, or ffmpeg), then using Proxy > Attach Proxies in Premiere to link the existing files, which doesn't involve Media Encoder at all.
Q: Does proxy reduce quality in Premiere Pro?
A: Not in your final export, as long as you relink to your original camera files before rendering. The proxy only affects what you see on screen while editing; the delivered file comes from the full-resolution original once relinked.

Cutback Team
Share post