Effortlessly Resize Your Video to Any Format in Premiere Pro Without Starting Over
Need to convert a video to a square format in Premiere Pro? Follow this step-by-step guide to resize without losing quality or disrupting your edits.
TLDR: Resizing a video to a different format in Premiere Pro without re-editing is done by creating a new sequence at the target dimensions and using Auto Reframe to reposition the subject automatically, no manual keyframing needed.
Sometimes, as a video editor, you might find yourself having to create another format for a video that you’ve already edited in Premiere Pro, especially when repurposing content. You might be curious about things like the correct TikTok video dimensions for Premiere Pro or sizes for YouTube, etc. This isn’t always as easy as simply changing the sequence settings.
For instance, if you’ve created a horizontal long-form video and need to transform it into a vertical short-form video for Instagram Reels, TikTok, or even YouTube shorts, or even a square format, you might run into issues like cropped clips, glitched layers, or black screens in the preview.
Here’s the best way to resize your video while keeping control over individual clips and maintaining their quality.
The Best Method for Resizing a Video In Premiere Pro
If you want to adjust individual clips without having to re-edit everything from scratch, follow the step-by-step guide below.
Step 1: Nest Your Original Sequence
Select all clips in the timeline of your existing project.
Right-click and choose [Nest] to create a single nested sequence.
Step 2: Create a New Sequence In Your Desired Format/Ratio
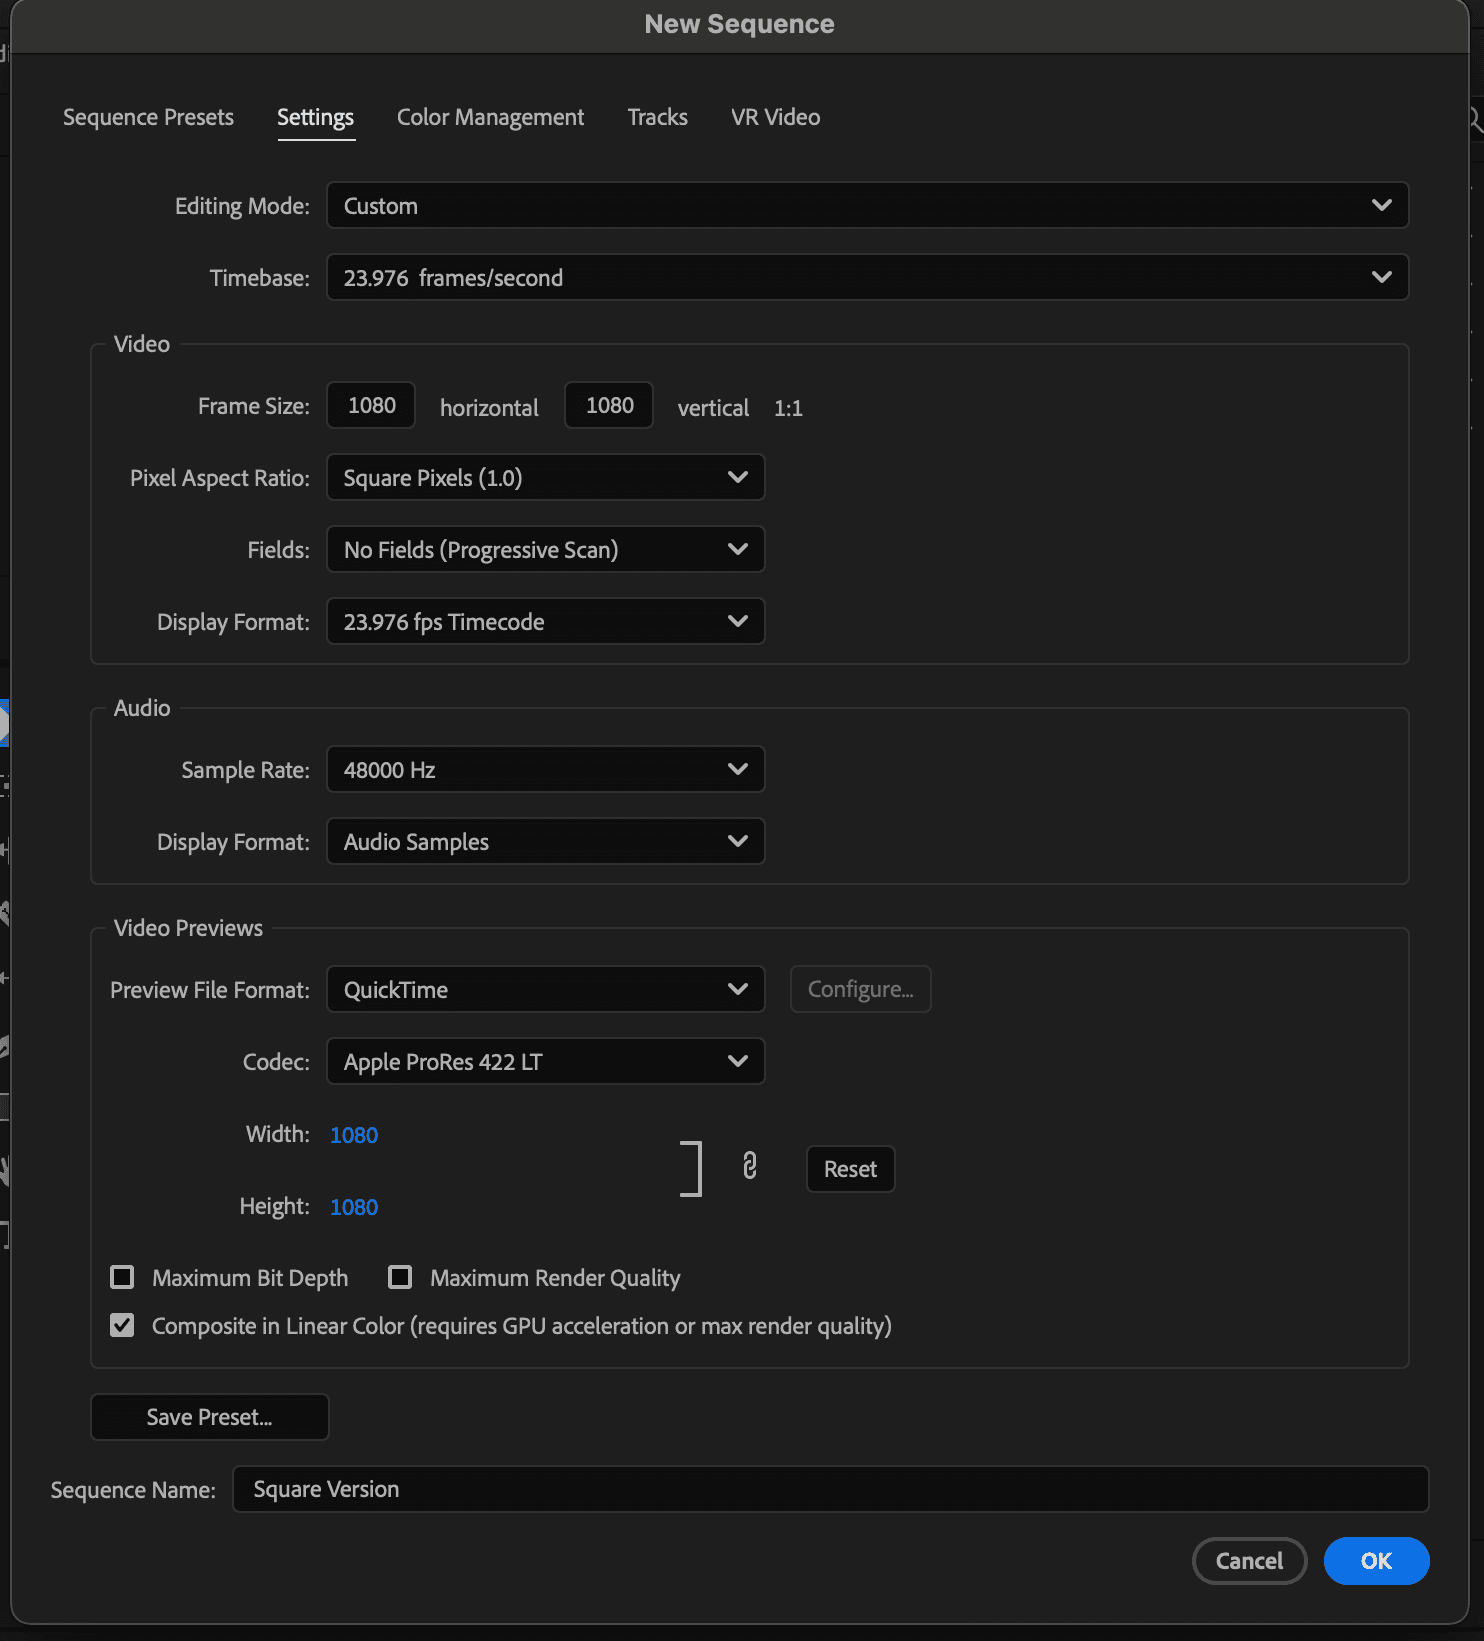
Go to File > New > Sequence.
In the [Settings] tab, manually adjust the frame size to your required ratio, depending on the needs of the platform you will be posting your video on.
Name your new sequence something that makes it clear that this edit is in a new format, e.g., ‘square version’
Step 3: Add the Nested Sequence to the New Sequence
Drag the nested sequence from the Project panel into your new sequence.
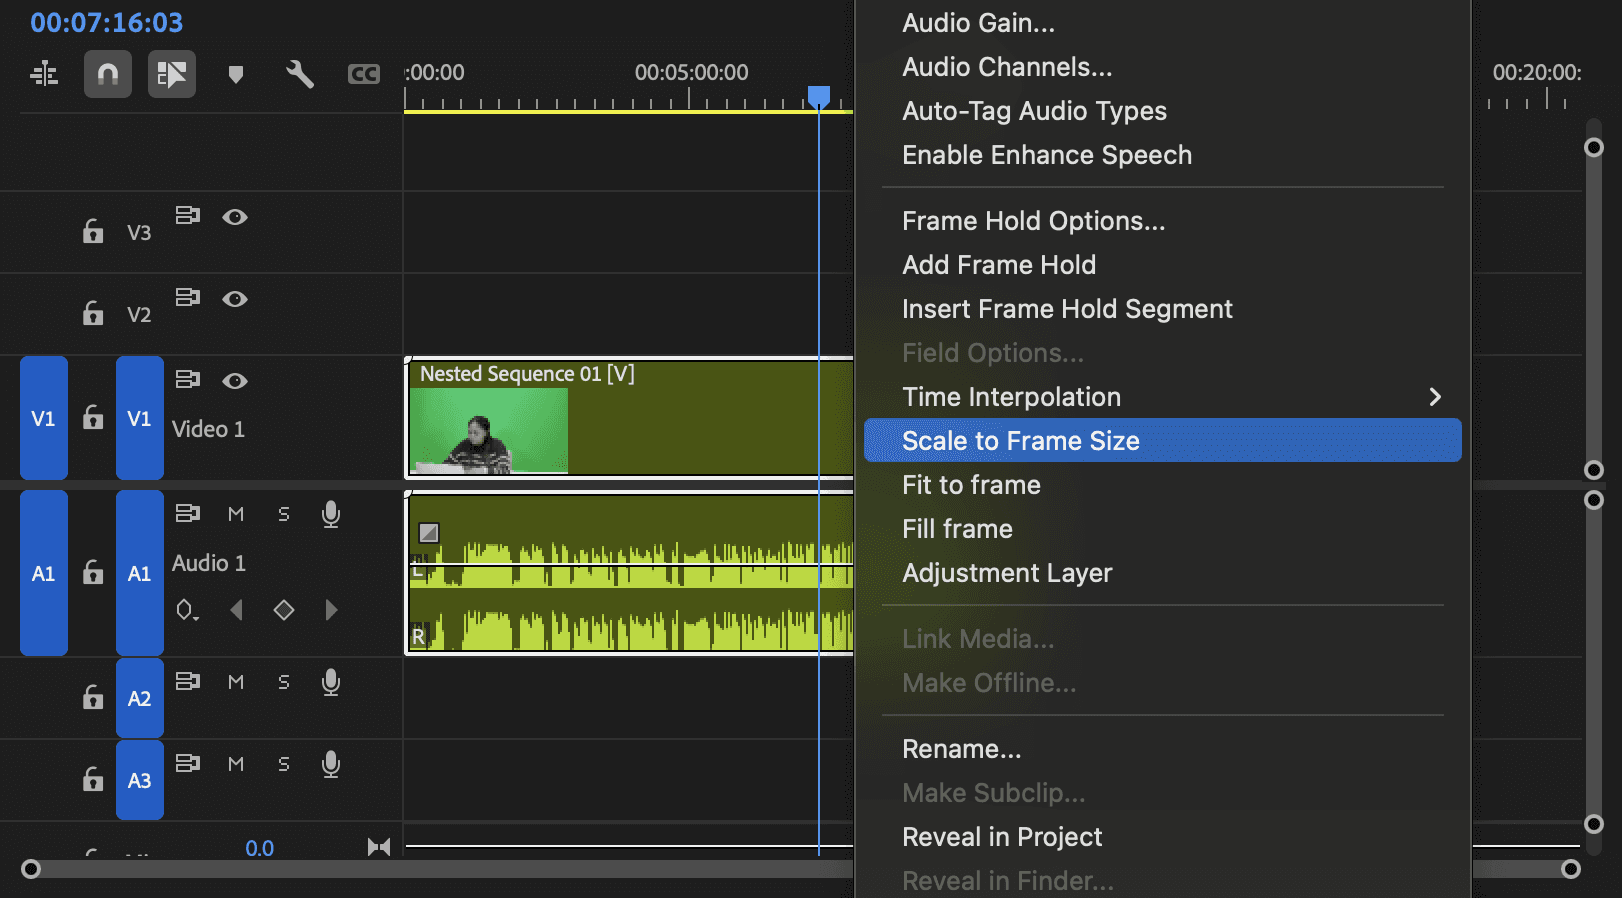
Right-click the nested sequence in the timeline and select [Set to Frame Size].
Then, right-click again and choose [Scale to Frame Size/Set to Frame Size] for best resizing results.
Step 4: Use Scene Edit Detection (If Needed) To Adjust Certain Frames
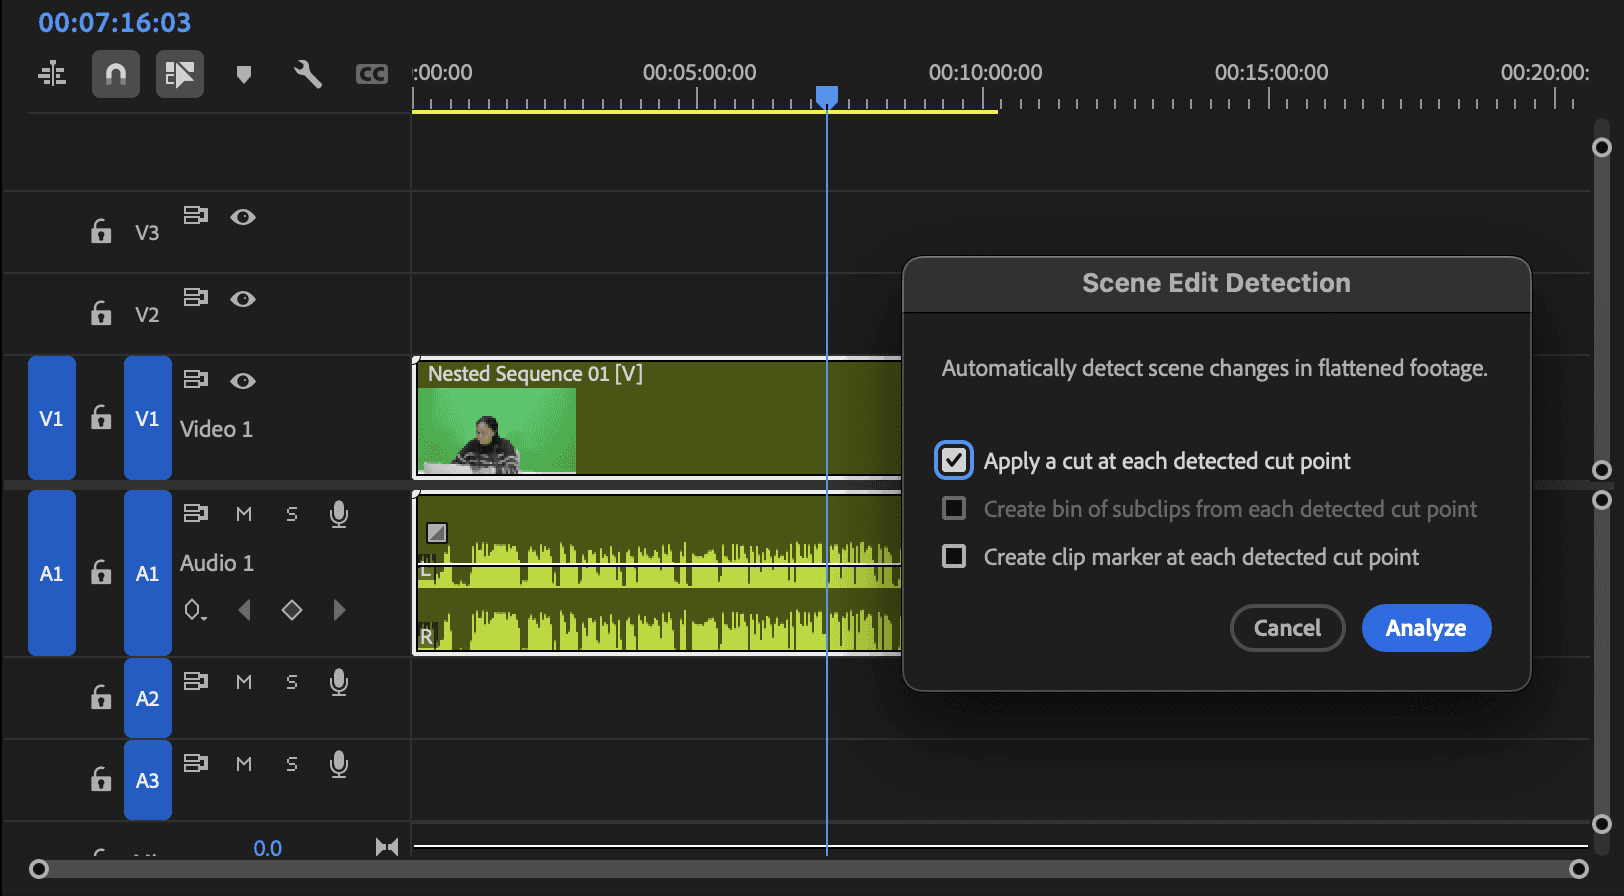
If your video is a montage with many edits, you can use Premiere Pro’s [Scene Edit Detection] to break the nested sequence back into individual clips.
Right-click the nested sequence and select [Scene Edit Detection].
This will split the sequence into separate shots, allowing you to manually reposition each one as needed.
Step 5: Adjust Each Clip for the New Format
Click each individual clip and adjust its position in the Effect Controls > Motion panel.
If necessary, manually resize or crop clips to fit within the new frame.
Step 6: Preview and Export
Play through your sequence to ensure clips are properly aligned.
Go to File > Export > Media.
Choose [H.264] and a preset like ‘Instagram 1080 x 1080’ or ‘Custom 1200 x 1200’.
Click [Export].
Resizing Video Troubleshooting Methods
If your workflow is glitchy or causing black screens, try these alternative fixes:
Copy and paste your timeline into a new sequence in your desired format instead of nesting it.
Manually adjust clips instead of using Scene Edit Detection if Premiere is lagging.
Check effects layers to ensure they apply correctly to the new sequence.
By following these steps, you can effectively resize your video into any new format in Premiere Pro, without having to re-edit your video from scratch. This method ensures that your clips maintaining in their original composition while fitting into the new aspect ratio that you’ve chosen.
Check out more details on improving your AI content creation workflow and how to optimize your video editing preference here.
For more Premiere Pro editing tips and tricks, explore our latest content on the Cutback blog or Cutback’s official YouTube channel.
Frequently Asked Questions (FAQs)
Q: How do I change the aspect ratio of a video in Premiere Pro without re-editing?
A: The cleanest method is to nest your existing timeline into a single nested sequence, create a new sequence at your target dimensions, drag the nested sequence in, and use Auto Reframe to reposition the subject automatically. This preserves all your edits without touching the original timeline. If you need per-clip control, use Scene Edit Detection on the nested sequence to break it back into individual shots that you can adjust manually.
Q: How do I resize a video in Premiere Pro for Instagram?
A: Create a new sequence at your target Instagram dimensions, 1080x1080 for square, 1080x1350 for portrait feed, or 1080x1920 for Reels. Nest your existing timeline, drag it into the new sequence, right-click and select Set to Frame Size, then use Auto Reframe to keep your subject centred in the new crop. Export using the H.264 codec with the Instagram preset or a custom resolution matching your target format.
Q: What is Auto Reframe in Premiere Pro, and when should I use it?
A: Auto Reframe is a Premiere Pro feature that uses AI to automatically detect and track the primary subject in a clip and reposition the frame when you change the aspect ratio. Instead of manually keyframing the position of every clip when converting a 16:9 video to 9:16 for TikTok or Reels, Auto Reframe handles the repositioning automatically. It is not always perfect on complex shots with multiple subjects or fast movement, but it eliminates most of the manual work on talking-head and interview content.
Q: How do I change a video from 16:9 to 9:16 in Premiere Pro?
A: Go to File > New > Sequence, set the frame size to 1080x1920 in the Settings tab, and name it clearly (e.g., "vertical version"). Nest your original 16:9 timeline, drag it into the new sequence, right-click, and choose Set to Frame Size. Then apply the Auto Reframe effect to reposition the subject in the vertical frame. For a montage with many cuts, use Scene Edit Detection to split the nested sequence into individual clips for per-shot adjustments.
Q: How do I scale a video in Premiere Pro without losing quality?
A: To scale without degrading quality, use Set to Frame Size (right-click the clip in the timeline) rather than Scale to Frame Size. Set to Frame Size adjusts the clip scaling non-destructively in the Effect Controls panel, while Scale to Frame Size bakes the scaling into the clip permanently. Always work from the highest-resolution source footage available. When exporting, use H.264 with a bitrate matched to your target platform rather than reducing resolution below your source.
Q: How do I change a clip to 1920x1080 in Premiere Pro?
A: Go to File > New > Sequence > Settings and set the frame size to 1920x1080. If your clip is a different resolution, drag it into the sequence, right-click, and select Set to Frame Size to scale it to fill the 1920x1080 frame non-destructively. For clips shot at a lower resolution than 1080p, upscaling will reduce quality. Always record at 1080p or higher if 1920x1080 is your target output.
Q: How do I change the size of a single clip in Premiere Pro?
A: To resize an individual clip rather than the whole sequence, select it in the timeline, open Effect Controls, and adjust the Scale value under Motion. Dragging the scale slider up increases the clip size; pulling it down reduces it and adds letterboxing or pillarboxing, depending on the aspect ratio. This is different from changing the sequence dimensions; adjusting clip scale leaves the sequence frame size unchanged and only affects how that clip fills the frame.
Q: How do I reduce video file size in Premiere Pro?
A: File size reduction at export is controlled by codec and bitrate. In the Export Media dialog, choose H.264 as your codec and lower the target bitrate, for YouTube a target of 8-16 Mbps for 1080p is sufficient; for Instagram, 3.5-5 Mbps delivers acceptable quality at a smaller file size. Avoid reducing resolution unless necessary, as bitrate compression preserves more quality than downscaling. For significant file size reduction without re-exporting, use Adobe Media Encoder's compression presets after the initial export.

Kay Sesoko
Marketer
Share post