Premiere Pro Transcription Formatting: How to Adjust Indents, Layout, & Fix Common Issues
Premiere Pro auto transcription not working? Learn how to adjust indents, line breaks, and layout settings for a cleaner, more readable transcript. Optimize your transcription workflow with these quick fixes and plugin recommendations.
TLDR: Auto transcription formatting issues in Premiere Pro, incorrect line breaks, speaker labels, or caption timing, are usually fixed by re-transcribing with the correct language selected and resetting the caption track settings.
When Adobe Premiere Pro added its automatic transcription feature, it changed the game for editors using text-based editing. This video editing tool helped them speed up their subtitle and captioning work. However, people still recognize it for not always being accurate. It can also have common formatting issues that are hard to fix.
It can be frustrating to deal with random indents, odd line breaks, and inconsistent layouts that can make things messy. Here’s how to fix auto-transcription in Premiere Pro and get better control over your transcription formatting.
How to Enable Auto Transcription in Premiere Pro
If you’re new to Premiere Pro’s auto transcription and not sure it’s working, follow these steps to enable the feature:
Go to the Text Panel [Window > Text] on your program monitor
Click [Transcribe Sequence] to auto-transcribe your sequence
Choose the Audio Track and language settings
Select [Transcribe] to create a transcription
Once you transcribe your video, your speech-to-text transcription will appear in the Transcript tab
If Premiere Pro's auto transcription is not working, check your internet connection.
Make sure that your audio file is clear and easy to transcribe. Transcribing after you've cleaned up background noise and made audio adjustments is better.
Also, ensure that you select the project sequence correctly. Also, update to the latest Adobe Premiere Pro version for full feature access.

How to Fix Auto-Transcription in Premiere Pro
1. Check the Transcript Panel Formatting Options
After generating your auto transcript in Premiere Pro, check the Transcript Panel itself. This is the first step to resolving formatting issues. Many users forget that Premiere offers subtle yet useful controls directly in this panel.
Start by checking if the Transcript Panel allows any layout adjustments, such as Premiere Pro transcription indent settings. You can adjust text formatting in Premiere Pro transcription by following these steps:
Navigate to Text Panel → Transcript Tab
Look for settings related to filtering, segment breaks, or speaker labels
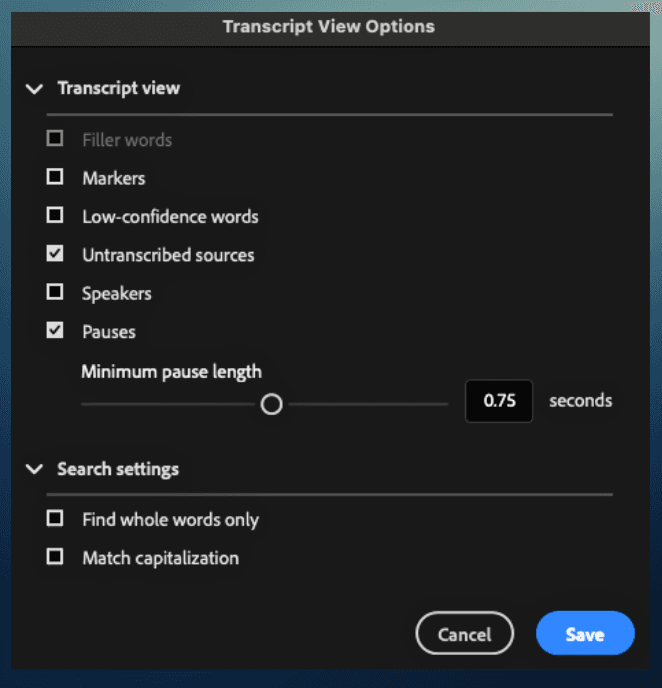
If line breaks seem inconsistent or the indentation seems off, try adjusting [Transcript View Options]. Sometimes switching from viewing the transcript without seeing the speakers can fix any weird layout issues.
If the formatting still looks wrong, try rerunning the auto transcription with different language settings. There might be problems with aspects like spacing if Premiere Pro transcribes in the wrong language.
These controls aren't as advanced as those found in word processors. But knowing how to tweak the settings in the Transcript Panel can improve the formatting of your auto transcription.
2. Convert Transcript to Captions for More Control
If this still isn't cutting it, converting the Premiere Pro auto transcript to captions gives you more control. When you hit [Create Captions] in the Text Panel, you unlock a whole new set of customization options.
For improved control over layout and indentation, here are some Premiere Pro caption formatting tips:
Click [Create Captions] in the Transcript tab
Choose a format (single-line, double-line, etc.)
Make text edits in the Captions tab, then move to the Properties Panel and Essential Graphics Panel for further control
Here, you can tweak text alignment, spacing, and make changes to caption styles
You can also change the number of characters per line, the number of lines, and the maximum line length
This workflow is especially helpful if you're creating subtitles or captions for social media, YouTube, or media distribution. For a step-by-step guide on how to add captions in Premiere Pro using an auto caption plugin, check out our article!
3. Use a Plugin for Advanced Transcription Formatting
Sometimes, the default Adobe Premiere Pro auto transcript tools just don’t cut it. In that case, you can use an auto transcription plugin tool to get the job done instead.
Here are three AI transcription tools that work with Premiere Pro. You can use them to create accurate transcripts for your videos.
Simon Says AI – Known for better structure and formatting
Premiere Assistant - Known for highly accurate transcription in over 100 languages and full control over structure and formatting. It can also produce a rough cut for you afterwards.
Transcriptive by Digital Anarchy – Offers text editing, speaker separation, and layout control
If you would like even more suggestions on the best video transcription tools, then check out our featured article, too.
Tools like these are valuable. They make your transcription workflow easier with features like more language packs. They also help with other parts of video editing, such as rough cut editing.
4. Export and Edit the Transcript in External Software
If you choose not to use an auto transcription tool or plugin, you can use external software. This will help you fix layout issues.
Go to the Transcript Panel and click [Export Transcript] in your desired file format (e.g., srt files, txt files, etc.)
Open the exported text file in Word, Notepad, or Google Docs
Manually fix line breaks, spacing, and indentation to your liking
Re-import or use it as a script alongside your video and audio
If you have layout problems or need to enable auto transcription in Premiere Pro, these solutions can help. They will help you clean up your Adobe Premiere Pro auto transcript quickly.
When set up correctly, Premiere Pro's speech-to-text auto transcription saves a lot of time. Just be careful not to let formatting issues slow you down.
Try these fixes to achieve the best Premiere Pro transcription workflow and get back to editing with clean, accurate captions.
If you'd like to read more about troubleshooting Premiere Pro, check out our guide that includes video editing system requirements and more.
For more tips and tricks for Premiere Pro editing, check out our latest posts on the Cutback blog or our YouTube channel.
Frequently Asked Questions (FAQs)
Q: Why is my Premiere Pro transcription not working?
A: The most common causes are an unstable internet connection (Premiere Pro's transcription requires an active connection to Adobe's speech-to-text servers), an incorrect language selection that doesn't match your audio, audio that is too noisy or quiet for the speech recognition engine to process accurately, or an outdated Premiere Pro version that lacks the latest transcription model. Check your connection, clean up your audio levels before transcribing, confirm the correct language is selected in the Transcribe Sequence dialog, and update to the latest Premiere Pro version before re-running the transcription.
Q: Why is Premiere Pro transcription not accurate?
A: Premiere Pro's built-in transcription uses Adobe's speech-to-text engine, which is optimised for clean, close-mic English audio. Accuracy drops significantly on overlapping speech, background noise, strong accents, technical terminology, and non-English content. The engine is also limited to 19 languages and does not support word-level time sync, meaning timestamps are sentence-level rather than per-word, which affects how precisely you can cut from the transcript. For higher accuracy across 100+ languages and word-level timestamps, Premiere Assistant uses a separate speech-to-text engine that consistently outperforms Premiere Pro's native transcription, especially on multilingual and non-standard audio.
Q: How do I change the language for transcription in Premiere Pro?
A: In the Text Panel (Window > Text), click Transcribe Sequence. In the transcription dialog, change the Language dropdown to your target language before clicking Transcribe. If you have already run the transcription in the wrong language, you need to delete the existing transcript and re-transcribe, you cannot change the language of an existing transcript after it has been generated. Premiere Pro supports 19 languages natively. If your language is not in the list, Premiere Assistant supports 100+ languages and can be used as a direct replacement for the native transcription step.
Q: Why is Premiere Pro transcription taking so long?
A: Transcription time scales with clip length and depends on Adobe's server load at the time of processing. A 60-minute recording can take 5-15 minutes or longer. The transcription runs on Adobe's cloud servers rather than locally, so your CPU and RAM do not affect the speed, but a slow or unstable internet connection will. If transcription appears stuck, check your connection and verify that Premiere Pro is not running other background processes like rendering or media analysis simultaneously. Cancelling and restarting the transcription sometimes resolves a stalled job.
Q: How do I fix transcription formatting issues in Premiere Pro?
A: For indentation and line break issues, go to the Text Panel > Transcript Tab and check the Transcript View Options, switching speaker label display on or off sometimes resolves inconsistent layout. For more control, convert the transcript to captions by clicking Create Captions in the Transcript tab, then adjust line length, character count, and text alignment in the Properties Panel and Essential Graphics Panel. If formatting issues persist, export the transcript as an SRT or TXT file (click Export Transcript in the Transcript Panel), fix the layout in an external text editor, and re-import.
Q: How do I format captions in Premiere Pro?
A: After generating captions from your transcript (Text Panel > Transcript Tab > Create Captions), select caption segments in the timeline and open the Essential Graphics Panel (Window > Essential Graphics) to adjust font, size, colour, and alignment. In the caption settings dialog, you can control the maximum number of characters per line, the number of lines per caption block, and minimum duration. For consistent styling across all caption segments, use Paste Attributes after styling one segment to apply the same formatting to all others. For animated, word-level, or karaoke-style captions, Premiere Assistant handles styling with presets rather than per-segment manual adjustments.
Q: Is there a plugin for Premiere Pro transcription that improves accuracy?
A: Yes. Premiere Assistant is the highest-accuracy transcription plugin for Premiere Pro, supporting 100+ languages with word-level timestamps compared to Premiere Pro's native 19-language, sentence-level transcription. Other options include Simon Says AI for structured multilingual transcription and Transcriptive by Digital Anarchy for speaker separation and layout control. All three require a paid plan or trial period rather than being fully free.

Cutback Team
Share post


