AI-Powered Captions: How to Auto-Generate Accurate Subtitles for Your Video
Introduction
The [Edit Captions] menu allows you to generate transcription automatically using AI speech recognition and easily edit them afterward. With AI model, you can produce highly accurate transcriptions in 100+ languages. You can also apply effects like zoom or animated caption, or add b-roll resources directly from the text.
This page covers:
✅ How to generate accurate auto-transcriptions ✔️
✅ Detailed instructions on editing captions in Cutback 🔎
✅ Helpful features for editing captions 🔧
✅ Frequently asked questions 💬
Getting Started
Step 1. Open a new project file in Adobe Premiere Pro and prepare your audio and video files in the sequence.
Step 2. In the top menu of Premiere Pro, go to [Windows] > [Extension] > [Cutback] to launch Cutback.
Step 3. Select the [Edit Captions] menu.
Step 4. Configure the settings for video transcription:

Select Range: Choose the range for transcription
[Whole sequence]: Generates transcript for all tracks in the current sequence.
[Select Clip]: Generates transcript only for selected clips in the sequence.
[In/Out]: Generates transcript only for In/Out points set in Premiere Pro.
Select Language: Choose the language spoken in the video. Only one language can be selected at a time.
Preview On/Off: If preview is turned on, you can review the edits before applying them to the sequence.
Note: Turning on preview will require encoding time. If you're editing a long video or need faster performance, turning it off can speed up subtitle generation.
Speakers:
If you have only one speaker, select [One person]
If you have more than two speakers, select [Multiple]
If each speaker has a separate mic and is recorded on different audio tracks, you can select [Audio separated] and assign names to each track.
If all voices are on a single audio track, you can select [Audio not separated] and enter the number of speakers. AI will distinguish them by voice.
Video: Choose the number of video tracks. If there are multiple speakers with separate audio tracks, you can also assign corresponding video tracks.
Names & terms: Provide extra context to help AI generate accurate transcript.
Keywords: Enter specific keywords like names or proper nouns to improve subtitle accuracy.
Script reference: Paste the script so AI can reference it while transcribing.
Step 5. When you’re done setting up, click the [Transcribe video to edit caption] button.
Editing Auto-Generated Captions
❗ Before You Start
Once you click [Transcribe video to edit caption], any edits made to the sequence in Premiere Pro will not sync with Cutback, which can cause misalignment between the transcription and your timeline. To prevent this, audio tracks are locked by default while working in Cutback.
Edits made in the sequence are not reflected in Cutback.
Make sure to finish your work in Cutback and click [Apply to sequence] before making any additional edits directly in the sequence.
Your progress is automatically saved per sequence in real time.
If you restart Premiere Pro and open the same sequence, launching Cutback will restore your previous work.
Step 1. Edit Captions
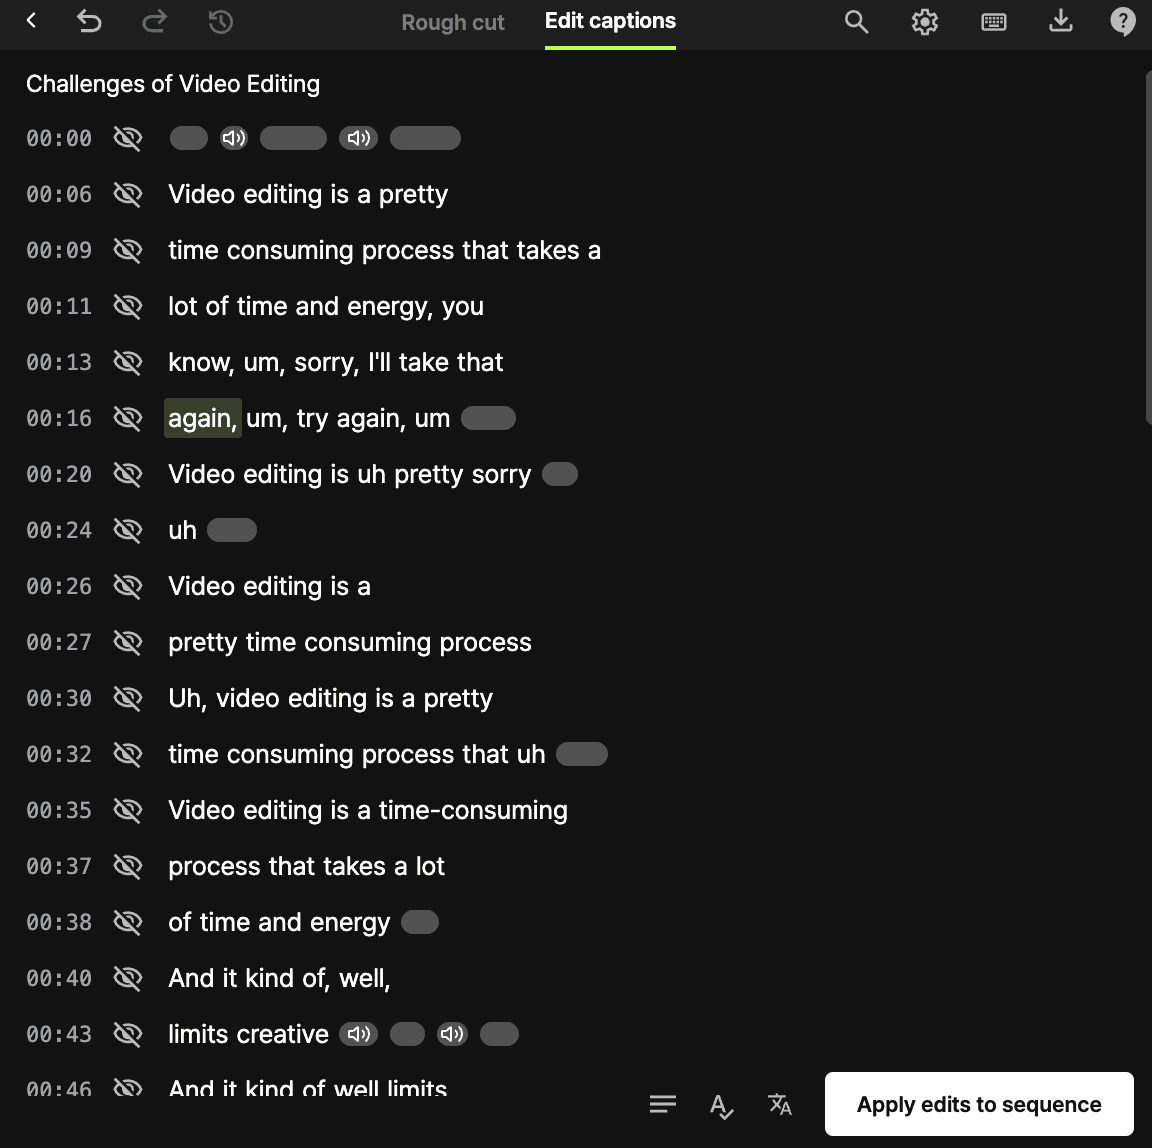
Edit a word: Double-click a word or press the ; key to edit it.
Merge words: To merge with the previous word, press n. To merge with the next word, press m.
Split a word: Double-click or press ; to enter edit mode, then add a space where you want to split, and press Enter.
Merge sentences: Press Delete on the first word of the second sentence you want to merge.
Split a sentence: Press Enter on the word where you want the sentence to break.
Hide captions (without deleting the cut):
Press h to hide the selected word’s caption.
Press shift + h to hide the entire sentence’s caption.
Click the eye icon at the beginning of a sentence to hide its caption.
Step 2. Adjust in Timeline
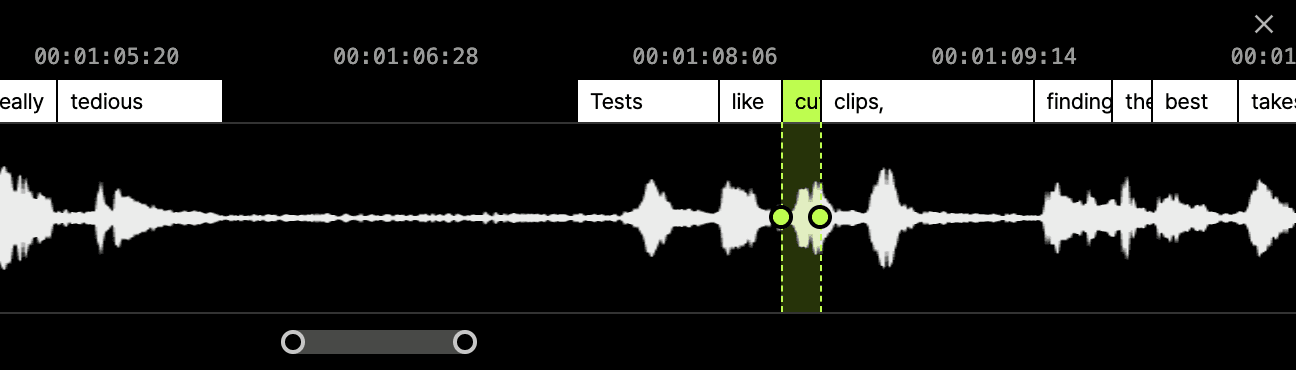
For more precise editing, use timeline in the bottom to view the audio waveform while editing.
You can collapse the timeline using the X button in the top-right of the timeline.
When the timeline is collapsed, a [Timeline] button appears in the bottom-left corner of the Cutback panel. Click it to expand again.
Step 3. Apply to Sequence
Click [Apply to sequence] to add captions. You can choose between two types:
Premiere Pro Captions – Adds captions as a native caption track.
Motion Captions – Adds captions as styled graphic track after selecting the caption effect.
Useful Features for Editing Captions
Caption Format

Max length per line: Set the maximum number of characters or words per line.
Punctuation: Choose whether to display punctuation marks like periods, commas, question marks, and exclamation points.
Multi-line: Display captions in two lines instead of one.
Lettercase: Choose between uppercase, lowercase, or title case.
Add effects and resources
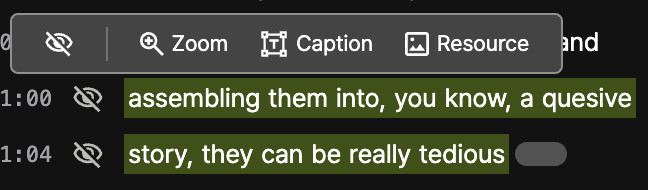
Zoom: Want to zoom in on a specific part of the video? Select the text where you want the effect and click [Zoom Effect].
Animated caption: To apply effects to specific captions only, select the relevant text and click [Caption]. (For more details, check the guide.)
Resources: Need to insert an image, GIF, or video clip in the middle of your content? Select the part you want and click [Resource]. (For more details, check the guide.)
Add marker: Want to leave a note for editing later in Premiere Pro? Press i to add a marker with a memo at the current timestamp in the sequence.
Translation
Translate captions and add the translated text as a new track. See the guide for more details on how to use caption translation.
Explore More Features in Cutback
Various tools in the menu bar

Undo / Redo: Use these buttons when you want to undo or redo an edit in Cutback. You can also use the shortcuts u (undo) and r (redo) for quick access.
Time Machine: If you've applied changes to the sequence but want to go back to the state before applying them, try using the Time Machine. It backs up the project just before you hit [Apply to sequence], and you can restore that version by clicking the Time Machine button.
Find/Replace Words: You can search for and replace words in the generated transcription. Use the shortcut key f to open the tool quickly.
Export Transcription: Export the transcription as a .txt or .srt file. You can also copy chapters and timestamps from Smart Summary to use as YouTube chapters.
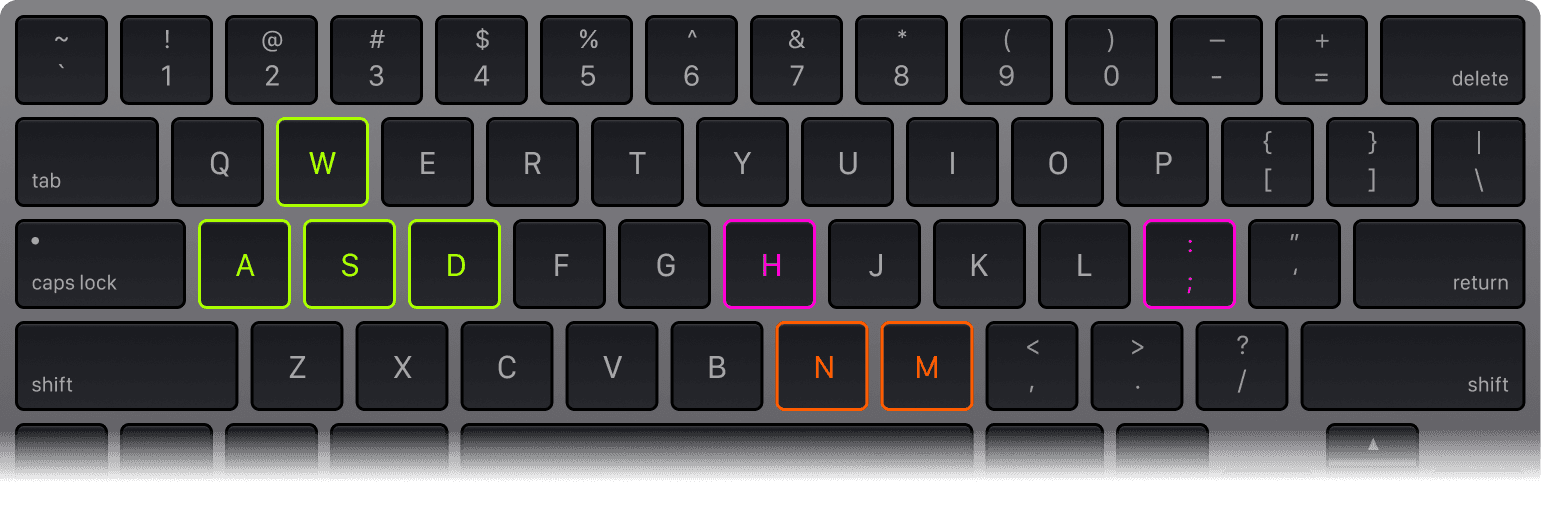
Use Keyboard Shortcuts
Move between words: w a s d
Edit a word: ;
Merge with previous word: n
Merge with next word: m
Delete word caption: h
Delete sentence caption: Shift + h
Tip: Click the keyboard icon at the top right of the Cutback panel to view more shortcuts.
Frequently Asked Questions
I want to reload the transcript I was working on.
If you've previously generated transcript for a sequence, the transcription file will remain available even after restarting Cutback or Premiere Pro.
Go to [Edit captions] and select [Open], or click on [Transcribe video to edit captions] > [Open previous transcript] to load the subtitle file.
❗Caution❗
If there’s an existing subtitle file and you select [Transcribe video to edit captions] > [Transcribe again], it will overwrite your previous work. The previous file cannot be recovered, so proceed carefully.
Also, if you edit the sequence in Premiere after applying subtitles via Cutback, and then reopen Cutback, subtitle sync issues may occur.
How can I change the font or color of the captions?
After clicking [Apply to sequence], you can adjust font and color in Premiere Pro’s Properties panel.
How do I apply caption effects to only certain parts?
Drag on the words and click [Caption].
Can I upload a caption file?
You can import .srt files. However, since SRTs don’t include word-level timestamps, timeline features won’t be available.
I edited the video in the sequence, and now the caption timing is off.
Changes made directly to the sequence won’t sync with Cutback. Please re-generate captions in Cutback.
I want to use graphic captions instead of captions.
First, click on [Apply to sequence] to add captions in [Premiere Pro captions]. Then, in Premiere Pro, go to [Graphics and Titles] > [Upgrade Captions to Graphics] to convert them to graphic captions.
The transcription isn't working properly. What should I do?
Check your Premiere Pro version: Cutback supports Premiere Pro 2023 and newer.
Change audio format: If you're using WAV and facing issues, try switching to AAC. In Cutback, go to [Menu] > [Settings] > [Audio Format] and select AAC.
Check internet speed: Cutback uses cloud servers for high-performance AI processing. If your connection is slow, audio upload may fail. We recommend an upload speed of at least 200 Mbps. You can test your connection at fast.com to check your upload speed.
If the issue still persists after trying all three steps, please reach out through the in-app chat in Cutback for further assistance.
It is taking too long after I click [Apply to sequence].
Automatic rough cuts often result in significantly more clips than manual editing. Since Premiere Pro isn't optimized for handling projects with hundreds or thousands of clips, actions like saving or applying edits can take longer than expected.To improve performance, try these tips:
Remove unused tracks
Remove unnecessary effects from clips
Split long videos into multiple sequences (e.g., 30-minute chunks)
Work on a device with higher performance specs