How to Edit Podcasts & Interviews in Adobe Premiere Pro (Beginner-Friendly Workflow)
Learn how to edit podcasts and interview videos inside Adobe Premiere Pro both manually and using AI tools, multicam workflows, and transcript-based editing. Perfect for beginners.
TLDR: Editing interviews and podcasts efficiently follows a consistent structure: sync and organize footage, remove unusable takes, cut for content using the transcript, then refine pacing; AI tools now handle the first two stages automatically.
Editing podcasts and interviews inside Premiere Pro can feel overwhelming when you’re new, especially with multicam angles, messy audio, and long tangents.
This guide walks you through the exact Premiere Pro workflow used by professional editors, and how modern AI tools like Premiere Assistant help speed up rough cuts, transcription, silence removal, and multicam prep.
Whether you’re transitioning from audio-only tools or leveling up your interview videos for YouTube and TikTok, this guide walks you through the whole workflow step-by-step.
Who This Guide Is for:
New podcast & interview editors
Premiere Pro users expanding into video podcasts
Creators repurposing content into short-form clips
Also read: Podcast & Interview Editing in 2026: The Complete Guide & The Complete Video Podcast Blueprint: 1-4 Person Setups, Camera Angles, & Lighting Diagrams
Why Use Premiere Pro for Podcast & Interview Editing?
Premiere Pro gives editors something other platforms struggle with: total control. You can refine timing, pacing, reactions, and overall delivery in a way that keeps audiences engaged.
Here’s why so many podcasters choose Premiere today:
It offers precise timeline editing, which is ideal for making conversations flow naturally.
Premiere handles multicam podcasts extremely well, with reliable audio-based sync.
It includes transcription and text-based editing, making long-form dialogue much easier to cut.
It supports plugins and AI-powered extensions that speed up repetitive tasks.
It is compatible with every major camera, microphone, and format used in professional podcast production.
Premiere gives you both creative control and workflow speed, especially if you repurpose content into short-form clips later on.
Step-by-Step Guide: How To Edit a Podcast in Premiere Pro
Step 1: Set Up Your Premiere Pro Project
Proper setup saves hours of cleanup later. Start by organizing your files before importing anything into Premiere.
Podcast editing folder structure
A good example layout looks like this:
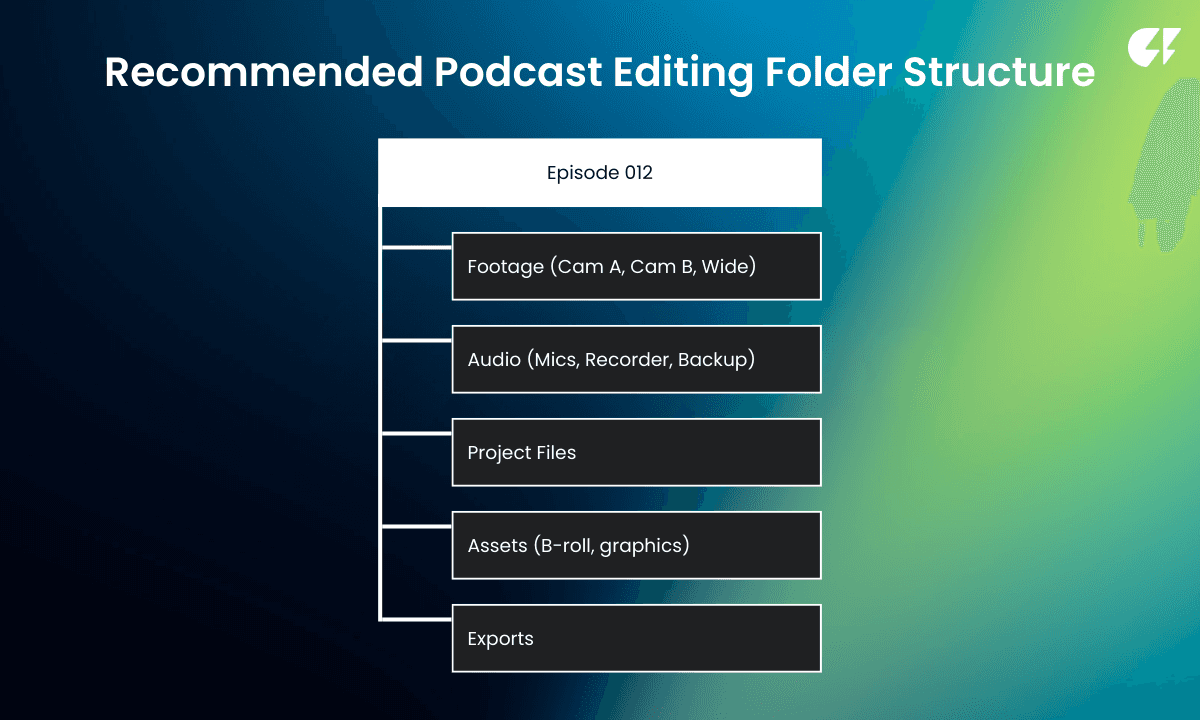
This structure makes every element quick to locate when editing.
Import settings when importing footage into Premiere Pro
Before importing, name camera angles clearly and attach metadata so you always know which track belongs to which speaker. If you recorded audio separately, make sure each file is labeled with the correct microphone or role.
After importing, keep camera file names intact for relinking reliability later on if you ever need to relink video files to the project.
Label speakers immediately inside your project (e.g., A = Host, B = Guest)
Should You Use Proxies in Your Podcast Editing Workflow
If | Do This |
Editing in 4K on a laptop | Use proxies |
Clean 1080p footage | Proxies optional |
Heavy color or effects | Strongly recommended |
For more on technical import settings, read our comprehensive technical guide.
Step 2: Sync Your Multicam Podcast Footage
Most podcasts involve at least three angles: a host camera, a guest camera, and a wide shot. Premiere’s built-in tools make syncing these angles fairly simple.
Using Premiere’s native multicam sync
Select your cameras and audio files in the Project panel.
Right-click and choose Create Multicamera Source Sequence.
Choose Audio as the sync method.
Verify that all angles and audio tracks align properly.
Create a sequence using the synced multicam clip.
Premiere will generate a unified multicam clip that lets you switch angles in real time while editing.
Using audio waveforms
Useful when multiple recorders are used
Make sure sample rates match (48kHz vs 44.1kHz mismatch causes drift)
Tips for Clean Multicam Workflows
Set the Wide camera as Angle 1
Group all audio tracks into one master layer
Enable [Audio Follow Video] when switching angles
Want to avoid manual syncing?
Selects (your soon-to-be go-to podcast editing software) auto-syncs video and audio, creates an auto assembly cut, and hands off to Premiere easily.
Step 3: Transcribe Your Episode Using Premiere Pro
Transcripts are one of the biggest workflow upgrades for podcast video editing.
Generating the transcript
Go to the Text panel and click Create Transcript.
Premiere will detect speakers and label them automatically.
Review speaker names and correct if needed.
Utilize text-based editing instead of the timeline
You can highlight a sentence in the transcript and simply delete it; Premiere removes that section of the video instantly. This prevents awkward pacing while removing mistakes and repeated thoughts.
Tip: Instead of scrubbing through the timeline to find moments, AI podcast editing software like Selects lets you search your episode like a document before you’ve even handed off the file to Premiere Pro.
Search for phrases like “That part about marketing,” or “Funny moment,” or “Sponsorship conversation.”
Step 4: Remove Silences, Cut Filler Words & Tangents
One of the most common podcast editing mistakes is not paying attention to disfluencies in speech. Every podcast has silences, hesitations, and hedging, to name a few obstacles.
Long pauses
False starts
“Um,” “like,” “you know…”
In podcasts, timing matters. Long pauses and filler speech can make an episode drag or distract from the topic being spoken about. It’s important to prioritize silence and filler word removal to improve viewer retention.
For editors working in DaVinci Resolve rather than Premiere, here's how silence removal works differently in Resolve, and why there's no native equivalent to Premiere Assistant.
Using transcript-based editing to remove silences in Premiere
You can either manually delete gaps in the transcript of Premiere Pro or use Cutback’s flagship plugin tool, Premiere Assistant, to do it automatically.
Premiere Assistant can automatically identify long gaps in conversation. You can review them and delete with one click.
Removing fillers automatically
Words like um, uh, like, and you know can be removed through:
Search in Transcript
Bulk delete
Manual pacing correction afterward
Premiere may still struggle with nuance. If you want smarter silence detection that understands topic flow, both Premiere Assistant and Selects can:
Then create or hand off a clean rough cut into Premiere.
Step 5: Build Your Rough Cut
Once your content is cleaned up, it’s time to shape the conversation.
Switching camera angles: Cutting between speakers
Cut to the guest during reactions or emotional responses. Cut to the host when asking questions. Let the audience feel the flow of a real conversation.
If a sentence needs rephrasing or a section is removed, a wide angle helps cover the jump cut seamlessly. Alternatively, if you have your stringout finalized and have moved into the rough cutting phase, consider using B-roll instead.
Using markers
Press M to mark:
Key insights
Funny interactions
Clips worth repurposing later
These markers become your short-form clip goldmine.
Step 6: Polish the Episode
This is where your podcast starts sounding professional.
Podcast audio cleanup
Normalize volume differences between speakers
Use gentle crossfades between cuts
Smooth out loud breaths or pops
Improve vocal quality: EQ & vocal enhancement
Add EQ to warm voices and reduce harshness
Apply compression to keep voices consistent
Use light noise reduction to remove hum or hiss
Premiere’s built-in voice enhancement tools can handle most cases well.
Adding music & sound effects
Keep music low (-12 to -18 dB under voices)
Include sound effects to create an immersive video
Brand your intro and outro
Small polishing touches make a big difference.
Step 7: Export Settings for Podcasts & Interviews
Your final export depends on where the episode will be viewed.
Platform | Best Format | Resolution | Audio Settings | Notes |
YouTube Podcasts | H.264 (.mp4) | 1080p or 4K | AAC 320 kbps | Higher bitrate (20–50 Mbps) recommended for crisp text + tight gradients |
Spotify Video Podcasts | H.264 (.mp4) | 1080p | AAC 256 kbps | Focus on clean audio since most users listen in mobile environments |
Vimeo Uploads (Client Review / Showreels) | H.264 or H.265 (.mp4) | 1080p or 4K | AAC 256–320 kbps | H.265 gives higher quality at smaller file sizes, especially for long episodes |
Client Master Deliveries | ProRes 422 or DNxHR | 4K preferred | WAV 48 kHz 24-bit | Best archival quality and ideal if another editor will do finishing work |
Tip: For client collaboration or team feedback, upload your rough cuts to Frame.io, which allows timestamped comments and visual markup directly over your podcast timeline, so changes are crystal clear.
Bonus: How Selects Complements a Premiere Workflow
Premiere is excellent for refining the final story, but the prep work can eat hours of your time.
Use Selects before handing off to Premiere for:
Removing long silences automatically
Cleaning filler words with better accuracy
Building a structured stringout in under a minute
Generating AI-found viral clips
Creating chapters and topics automatically
Then, finish your edit in Premiere with full control.
Related Guides to Continue Your Workflow
For more in-depth knowledge and modern podcast editing tips, check out our latest posts on the Cutback blog or our YouTube channel.
Frequently Asked Questions (FAQs)
Q: How do you edit a podcast in Premiere Pro?
A: The core podcast editing workflow in Premiere Pro follows five stages: set up your project with a clear folder structure and labeled tracks, sync your multicam footage using audio-based sync via Create Multicamera Source Sequence, transcribe the episode via the Text panel, remove silences and filler words either manually through transcript deletion or automatically using Premiere Assistant, and build your rough cut by switching camera angles to follow the natural conversation flow. For editors handling long-form multicam podcasts, running footage through Selects before opening Premiere handles sync, transcription, silence removal, and rough cut assembly upstream, so by the time you open Premiere Pro, the structural editing is already done.
Q: What software do professional podcast editors use?
A: Adobe Premiere Pro is the most widely used professional podcast editing NLE for video podcasts, primarily because of its multicam sync, transcript-based text editing, and plugin ecosystem. For audio-only podcasts, Audacity (free), Adobe Audition, and Hindenburg are common. For editors who want AI automation built into the workflow, Premiere Assistant handles silence removal, filler word cuts, and multicam switching inside Premiere Pro, while Selects handles the same tasks upstream before the footage reaches any NLE. The right choice depends on whether you are editing video podcasts (Premiere Pro) or audio-only episodes (Audition or Audacity).
Q: Can I edit a podcast on my phone?
A: Basic podcast trimming and cleanup is possible on mobile using apps like CapCut, Descript's mobile app, or Spotify for Podcasters' built-in editor. However, mobile editing has significant limitations for professional podcast production: no true multicam timeline, limited audio mixing, and no frame-level precision on cuts. For podcast creators who also produce video content, mobile editing is useful for quick social clips but not for the full episode edit. Premiere Pro on desktop with Premiere Assistant is the standard for editors who need professional output.
Q: Can you edit a podcast after publishing?
A: Yes, but the process depends on your hosting platform. On most podcast hosting platforms (Buzzsprout, Anchor/Spotify, Podbean), you can replace the audio file of a published episode and the updated version is distributed to subscribers automatically within 24-48 hours. The original episode URL stays the same, so existing listeners and directories are not affected. However, edits made after publishing will not retroactively update episodes already downloaded by listeners. For video podcasts published on YouTube, re-uploading resets watch time and algorithm momentum, it is better to trim using YouTube Studio's native editor for minor cuts rather than replacing the file entirely.
Q: What is the difference between editing a podcast on CapCut vs Premiere Pro?
A: CapCut is a mobile-first short-form video editor designed for quick social clips, it handles basic cuts, captions, and effects well but lacks professional audio mixing, multicam sync, and frame-level precision. Premiere Pro is a professional NLE built for long-form content with full multicam support, a dedicated transcript editor, and a plugin ecosystem that includes AI tools like Premiere Assistant for silence removal and caption generation. For a 60-second Instagram clip from a podcast highlight, CapCut works. For the full episode edit with multiple cameras, external audio, and tight pacing, Premiere Pro is the appropriate tool.
Q: What is Adobe Podcast and how does it fit into a podcast editing workflow?
A: Adobe Podcast is a browser-based tool that includes Enhance Speech, an AI audio cleanup feature that removes background noise and improves vocal clarity on recordings that were not captured in ideal conditions. It is free to use and works on uploaded audio files without needing Premiere Pro. In a Premiere Pro podcast workflow, Adobe Podcast Enhance Speech is most useful as a pre-processing step for audio that has background noise issues before you import it into the timeline. It does not replace a full NLE for structure editing, it addresses audio quality, not timing or narrative structure.
Q: How do I edit a podcast for free?
A: For audio-only podcasts, Audacity is a fully free, open-source audio editor that handles trimming, silence removal, noise reduction, and basic mixing. GarageBand is free on Mac and covers similar ground with a more beginner-friendly interface. For video podcasts, DaVinci Resolve is the only fully free professional NLE with multicam support and a complete feature set. Premiere Pro and Selects require paid plans after trial periods, Selects has a 7-day free trial, and Premiere Assistant includes limited trial usage before converting to a paid plan.

Kay Sesoko
Marketer
Share post


